Technology is evolving, and compact storage is the latest buzzword. If you are a tech fanatic, you probably already know the Synology DS723+ NAS. It offers one of the finest, compact, and capable storage options for homes and small businesses. This 2-bay flexible storage solution supports up to 7 drives, NVMe SSDs for caching, and additional storage pools. It also delivers faster networking speeds for users who need them. Powered by Synology DiskStation Manager (DSM), the NAS provides an all-in-one solution for data sharing, synchronization, backup, and surveillance.
When looking to set up compact and reliable storage, the Synology DS723+ NAS can be a perfect option. If you are looking to set up the same, this page will help you discover the steps to get started and complete the setup process easily.
Synology DS723+ NAS: Hardware Setup
Before you begin, you will need some equipment for the hardware setup part. Here are the tools and parts that you will need to collect:
- A screwdriver(for 2.5” drives)
- At least one 3.5” or 2.5” SATA drive.
Note: If you are installing a drive that contains data, it will be formatted. Please back up any important information on it before you start the installation process.
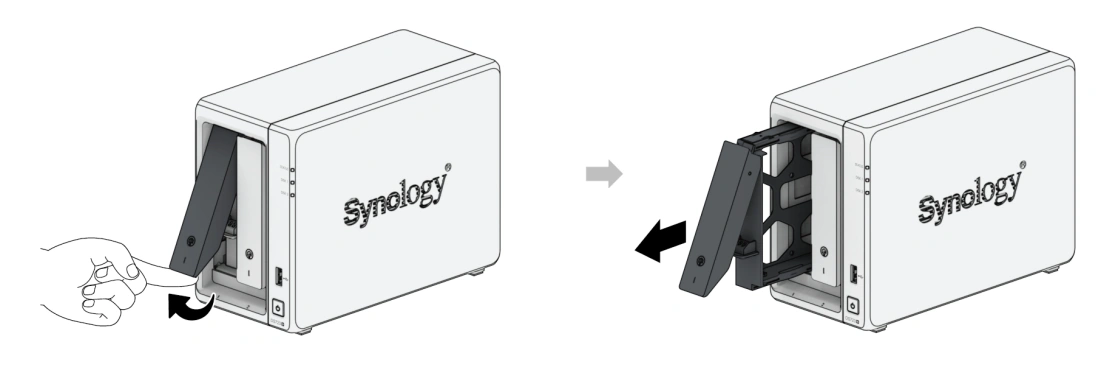
Installing Drives
- Remove the drive trays on the NAS. Pull the tray from the bottom and move it outwards.
- Load the drives in trays.
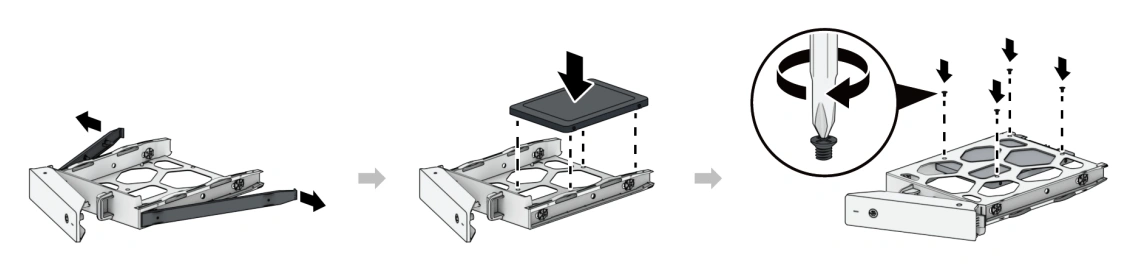
If you are installing a 3.5” drive, remove the fastening panels from the sides of the drive tray. Then place the drive in the tray and insert the fastening panels to secure it in place.

For 2.5” drives, remove the fastening panels from the sides of the drive tray and store them in a safe place. Place the drive in the designated area of the tray, as shown in the image below. Turn the tray upside down and tighten the screws provided to secure the drive in place.
Insert the loaded drive tray into the drive bay of the Synology DS723+ and push it back until you hear a click. Make sure the tray is completely inserted, or it may not function properly.
- Once the drive trays are inserted, you can install the network upgrade module.
Once this step is completed, add a memory module to the Synology NAS. When handling the memory modules, pay extra attention, as key components may be exposed and mishandling can cause them to malfunction.
- Finally, you can install an M.2 NVMe SSD. You can install up to two of these SSDs to your NAS.
Start your Synology DS723+ NAS
- Use a LAN cable to connect your Synology DS723+ to a switch, router or hub.
Connect one end of the power adapter to the power inlet on your NAS device and plug the other end into a power outlet.
- Turn on the power supply. Press the power button on your Synology DS723+ to turn on your Synology NAS device.
Your Synology NAS is now online and become detectable by computers on your network.
Install DSM on your Synology NAS Device
Once you complete the hardware setup of your Synology compact storage device, install DiskStation Manager (DSM) on it. Follow the steps below to proceed.
- Power on your Synology NAS device.
- Open a web browser on a computer that is connected to the same network as your Synology NAS.
- Enter one of these default login addresses in the URL bar of your web browser: find.synology.com Or, synologynas:5000.
The web-based setup wizard will now appear on the screen and automatically search for your Synology DS723+ on the network. You will see the status of your Synology NAS shown as Not Installed.

Click the Connect button to start the setup and follow the on-screen instructions to complete the installation.
If you get logged out of the installation wizard before completing it, sign in to DSL as admin and leave the password field blank. Use “admin” as the default account name.
Your Synology DS723+ is not ready to be used.